


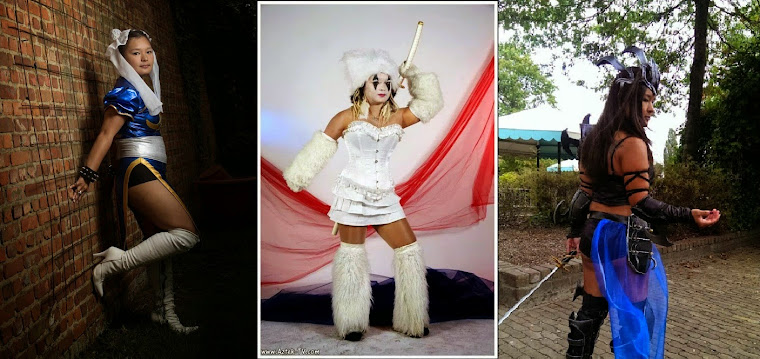
This project is mainly based on the artwork of
misha-dragonov and Noxychu and in game photo's.
going to be my first led and jewel casting project.
It is going to be my biggest en longest project ever.
Its going to be a mix of the above picture the in-game character and a bit of my own imagination.
The shoulder parts I want to make must open and close like the in-game model. This is going to be a challenge because I don't find any good tutorials about moving electronic mechanics...
For the led's and jewel casting tutorials I used the book of Kamui again and did some research on the internet.


Left picture the placed swich and right the construction of the led to the switch and resistor before soldering. Then seal it with silk gloss varnish.
Making the actual gem with the light results in a complete mess...
First of all tho make the molds I had to use a kind of silicone 2 components.
Then sculpting the actual shape out of clay.
Then when the molds where ready I could pour in the epoxy harsh.
And the smell of it is iiiiiiiiew and disgusting...
So think this through before you start with it!!! I had to open all windows and turn on the ventilator in my kitchen to get rid of the smell... Only the morning after the smell was gone. :-s
 Jewels itself turns out better then I thought because of the color differences as you can also see on the picture. I tried to color them in a purple color to mix red and blue but it didn't turned out that well.
Now the led itself is a purplish color so normally it should turn out well after I put some aluminium foil and nail varnish on the back of the gem. Let's see what the result is...
Conclusion resa cast/epoxy VS transparent worbla:
I prefer using transparent worbla instead of resa cast/epoxy.
But to add some color you need to use aluminium foil and a lot of nail polish in diffrent colors.
And clay to settle the gem onto the worbla. (see picture belt and buckle square gems)
Although I am not sure to recommend it for large or medium large gems I think the color would be too transparent... (So diffuse or fill the empty places with something)
But for adding leds into small and medium sized gems it's a good solution.
Because for the resa cast you need to put the led into the gem.
So when the led is broken you need to fix the whole gem and not only the led light!...
And with the transparent worbla you can put the led out and replace only the led. Since the led is stuck in a hole made in the construction of worbla...
Materials:
- violet led lights (5 mm 3,5 V by 25 ma)
- 9 V block batteries
- battery holder for 9V batteries
- some shrinking hose
- and resistance of 82 Ohm and 220 Ohm 330 Ohm for swithcing to an lipo battery of 11,1V
- (optional) breadboard to experiment first before I solder everything together.
- black/red wire (got it for free thanks to the nice selling man)
- sliding switches
- electric tape
- JST connector for easy plug in and plug out
- 250 ml A+B molding silicone (to make the mold for the gems)
- 250 ml ResaCast (to make the gems)
- mixing cup
- swizzle stick
- transparent worbla
- PVA primer
- Gesso
- worbla and a lot of worbla leftovers...
- A4 maxx
- EVA/craft foam
- Glue
- Metal scissors
- Air dry clay
- Fire resistant insulation foam (for horns and hooves)
- old shoes with a flat heel (hooves)
- Card bord
- Black marker
- Cutter knife
- Metal wire and cardboard (base for horns)
- Acrylic paint: white,silver,copper,grey,black and gold.
- paint brushes a big flat one, medium flat, small flat,small round and a tiny small round point
- Sanding paper
- Nail dremel (from my previous hobby)
- Nail polish (purple blue, glitter, purple glitter, transparent)
- Aluminium foil (backing of gem)
- Dremel multi tool for soldering and wood burning
- helping hand for soldering
- D-rings
- velcro
- Fabric: purple gold trimmings
- Plastic purple round tube thing (don't know the exact name of it) :-D
Left picture the placed swich and right the construction of the led to the switch and resistor before soldering. Then seal it with silk gloss varnish.
Making the actual gem with the light results in a complete mess...
First of all tho make the molds I had to use a kind of silicone 2 components.
Then sculpting the actual shape out of clay.
Then when the molds where ready I could pour in the epoxy harsh.
And the smell of it is iiiiiiiiew and disgusting...
So think this through before you start with it!!! I had to open all windows and turn on the ventilator in my kitchen to get rid of the smell... Only the morning after the smell was gone. :-s
Now the led itself is a purplish color so normally it should turn out well after I put some aluminium foil and nail varnish on the back of the gem. Let's see what the result is...
Conclusion resa cast/epoxy VS transparent worbla:
I prefer using transparent worbla instead of resa cast/epoxy.
But to add some color you need to use aluminium foil and a lot of nail polish in diffrent colors.
And clay to settle the gem onto the worbla. (see picture belt and buckle square gems)
Although I am not sure to recommend it for large or medium large gems I think the color would be too transparent... (So diffuse or fill the empty places with something)
But for adding leds into small and medium sized gems it's a good solution.
Because for the resa cast you need to put the led into the gem.
So when the led is broken you need to fix the whole gem and not only the led light!...
And with the transparent worbla you can put the led out and replace only the led. Since the led is stuck in a hole made in the construction of worbla...
Bracers

For this project I sandwiched eva foam between two layers of worbla. Because it made it stronger and I want to make it without attachments... I also used a glass bottle of cave to get the curvy shape right to pull it over my hand onto my forearm.
The details are made with worbla left-overs. I molded them and sculpt it into the right shape.
Most of the time I used my hands or something metal pointy thingy to sculpt it.
Next step is a layer of PVA primer then a few layers of gesso, sand it.
Than add again a few layers of gesso and sand it again. After this I can finally paint it with acrylic paint.
Next step is punching the holes into the black round thing for the gem and to add led light molded in the gem. This is going to be my next experiment because I am am total new into gem making and led lights...


For the cape I used a satin lace for the golden borders.

For the hooves I used insulation foam and old shoes that I never wore.


Here I used iron wire and worbla as a base. I started with the crown shaped model and added the pointy things on the back later and used clay to make the pointies a little bit thicker.
Then I added the shape of the antlers in cardboard.
Put insulation foam on top of it and started carving everything into shape.
When this is done I have to add the grooves into the antlers with a dremel. And cover it with worbla to insure the shape and the durability since insulation foam is breakable... But the foam was too breakable so I wrapped the insulation foam in worbla to secure it and with clay I going to add the grooves into the antler.

The picture to the left shows the armor for the antlers. First out of paper with trial and error then cut it out of crafting foam and add the details on it. Sandwich it between worbla and add it to the antlers.
When that is done its time to prime it and paint it.
For the wig I need to make something with an elastic band we'll see later how that will turn out...
Also I need to cut the wig in shape never done this before :-s so quite afraid to mess this up.


I already bought the materials so it's only a matter of time to experiment with it.
For this project I bought the following materials:
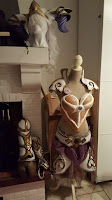
Pauldrons


Pauldrons
As a base I used an older pattern (the one from spell force) and I adjusted a bit...
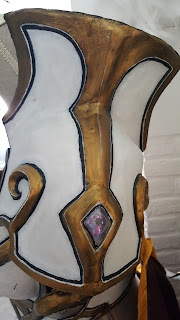
The base details are first layerd on eva foam then pressed out of the worbla.
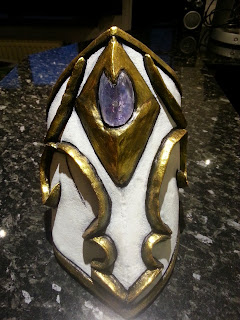
For the gem I used transparent worbla aluminium foil and a lot of nail polish for the color.
Light weight clay was used as a fixation for the transparent worbla to keep it in place.
But before I began with the clay I drilled a hole into the center of the square where the gem is positionned.
I used a 4mm drill. Sanded the surface of the gem to diffuse the light more.
then punshed the gem into the hole.
Glued the aluminium foil with the nailpolish into the center. And carefully made a hole for the led to come trough. Also added black lines on the the boarder of the alluminium foil since the clay is white and I wanted to add some shadow...
When I shaped the transparent worbla into a square I positionned it and placed the clay around the transparent square. For this step you need a lot of patience and trial and error...
You can use a bit of water with the clay to get a cleaner surface.
Let it dry for a day then you can send the clay with some sanding paper until you are satisfied.
Than put 3 layers of woodglue or thermoplastic primer on it to make it durable. Add 1 or 2 layers of gesso (thick gesso) and then you can start painting it.
Belt and buckle
I used EVA foam as a base and the base for the details.
For the attachment I decided to use magnets D-rings and velcro.
I added 3-D-rings on the back of the belt for the suspension of the purple fabric and 2 left and right for the attachment on my back.
Then it was priming and sanding time.
Paintjob:
For the base color of the paintjob I used black acrylic paint for the golden details and for the white base I used a self made mixture of acrylic paint ( white,silver,coper,grey) for a smooth transition I used also grey, black and white.
Belt will exist out of 7 leds 2 by 2 and 1 separate in parallel powered by a V9 battery pack.
The switch I still need to install and find a proper location for it. Next time I need to use proper wiring and not audio cable... And not forget to use the shrinking hose!
Then I added the led lights in the holes of the belt. I made a parallel connection.
For the square gems I used transparent worbla.
I taped alluminium foil onto the worbla and with nail polish I dyed it into the appropriate color.
The white thing is air dried clay. This is to set the shaped transparent worbla into place.
I decided to change the batteries into a li-po battery when the 9V batteries are empty.
Therefore I need a li-po battery of 7,4 V resistor of 180 ohm and 18 ohm. (1/4W)
Li-po battery charger JST connectors.
Cape and breast armor
For the cape I used a satin lace for the golden borders.
http://www.stoffen-hemmers.be/satijnen-lint-goudgeel-p-5736.html
For easy plug in plug out for the led's I used JST connectors.
For easy plug in plug out for the led's I used JST connectors.
Hooves
For the hooves I used insulation foam and old shoes that I never wore.
Also hot glue and the sticks and a cutter knife and some light weight clay.


Headdress


Here I used iron wire and worbla as a base. I started with the crown shaped model and added the pointy things on the back later and used clay to make the pointies a little bit thicker.
Then I added the shape of the antlers in cardboard.
Put insulation foam on top of it and started carving everything into shape.
When this is done I have to add the grooves into the antlers with a dremel. And cover it with worbla to insure the shape and the durability since insulation foam is breakable... But the foam was too breakable so I wrapped the insulation foam in worbla to secure it and with clay I going to add the grooves into the antler.

The picture to the left shows the armor for the antlers. First out of paper with trial and error then cut it out of crafting foam and add the details on it. Sandwich it between worbla and add it to the antlers.
When that is done its time to prime it and paint it.
For the wig I need to make something with an elastic band we'll see later how that will turn out...
Also I need to cut the wig in shape never done this before :-s so quite afraid to mess this up.
Leg armor


This is the armor for my thigh bone


Knee pads

Tail

The hamer of the Naaru
I made this under 1 week. Only to wear this on Halloween.
Battery and switch are hidden on the side. I used a V9 battery and 4 violet led's.
Also I used some wrapping material and stuck it to the transparent worbla with regular glue to diffuse the light. I used hot glue to stick everything together. I really recommend you to buy good hot glue and a good hot glue gun. I had a cheap one but I noticed it wasn't that good at all...
That's why I strengthened everything with thin stripes of black worbla...


Make-up
Test 1


Base grimas white
purple eyeshadow dark grey eyeshadow
black eyeliner pencil kohl and liquid
Conclusion:
Base I think ok but color is still too white
Base lips ok but color needs to be darker and thicker/fuller
highlight above lips
Eyes put white pencil under eye
highlight under eyes
Countour nose better
Chin contour sharper
Countour cheek higher in the middle
eyebrows slimmer and highlight between brows
Overall working steps
- Create a pattern (kamui and alter it or foil and painterstape...)
- Cut the pattern out of Eva foam /Craft foam (Fun/pipoos/minque/cosplaysupplies)
- Add the border details on the craft foam
- cut the pattern out of Worbla 2 times (one mirrored)
- Sandwich the craft foam between the worbla
- press out the details in the worbla with metal thing or flat side of scissors
- add additional details with worbla or clay transparent worbla ...
- Make the holes for the led lights
- Solder the wiring and electrical elements...
- Add the attachments D-rings...
- prime it with PVA primer 3 layers and gesso 2 or more layers (minque)
- sand the whole thing with sanding paper and dremel.
- add one layer of gesso
- add the basic colors black white or grey
- paint it starting from dark to light
- add the black and white lines
- seal it with silk gloss acrylic varnish (action shop)
- let it dry
- put on your finished work piece!
- Reconsider and think over what you can do better
- Make it even better! :-p